
10:1 Rule for Restaurant Menus: Exact QR Sizes and Proofing Checklist

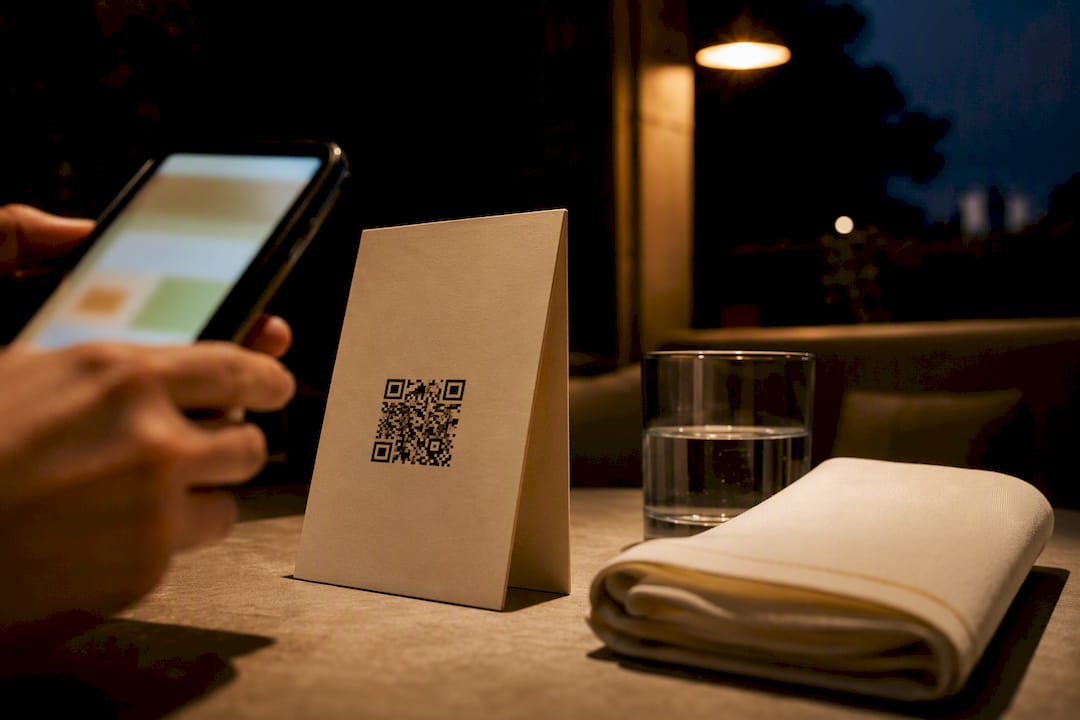
Size your menu QR code using the 10:1 rule: divide the expected scan distance by 10 to get a safe code width. For a table tent that’s roughly 40 to 50 centimeters from a seated guest’s eyes, that means printing the code at 4 to 5 centimeters, never smaller than the 2 centimeter floor. Before you commit to a full print run, protect the quiet zone, keep contrast dark on light, and approve a printed proof under your actual dining room lighting.
TL;DR:
Using the 10:1 rule ensures QR codes are large enough to scan from typical dining distances, with at least 4 centimeters for tables 40 to 50 centimeters away.
Match QR code size specifically to the surface and lighting conditions where guests encounter it, not just the design file used in proofing.
Maintain a clear quiet zone, high contrast, and matte finish during printing to prevent common scanning failures caused by glare or crowded borders.
Export QR codes as SVG or high-resolution PNG files and resize proportionally to avoid breaking the pattern and protective margins.
Implement dynamic QR codes with online menus to eliminate reprints when menu details change, while always testing proof copies in actual restaurant conditions.
Table of Contents
What Is the Right QR Code Size for a Menu?
The math behind menu QR sizing is refreshingly simple, and it comes from usability research rather than guesswork. NN/g’s guidelines treat 2 centimeters by 2 centimeters as an absolute minimum, then apply the 10:1 scan-distance rule to figure out what actually works in the real world. Divide how far a guest’s phone will realistically sit from the code by 10, and that number becomes your target width.
A code that technically meets the minimum spec can still fail on a dim patio table if the guest is holding a phone at arm’s length instead of six inches away. That’s the gap operators miss: a “minimum” size is a floor for laboratory conditions, not a promise for a Tuesday night rush with one overhead bulb flickering above table 12.
Pro Tip: If your dining room has mixed lighting, size for your dimmest table, not your brightest one. A code that scans easily under a bright window will often fail under a candlelit corner four tables away.
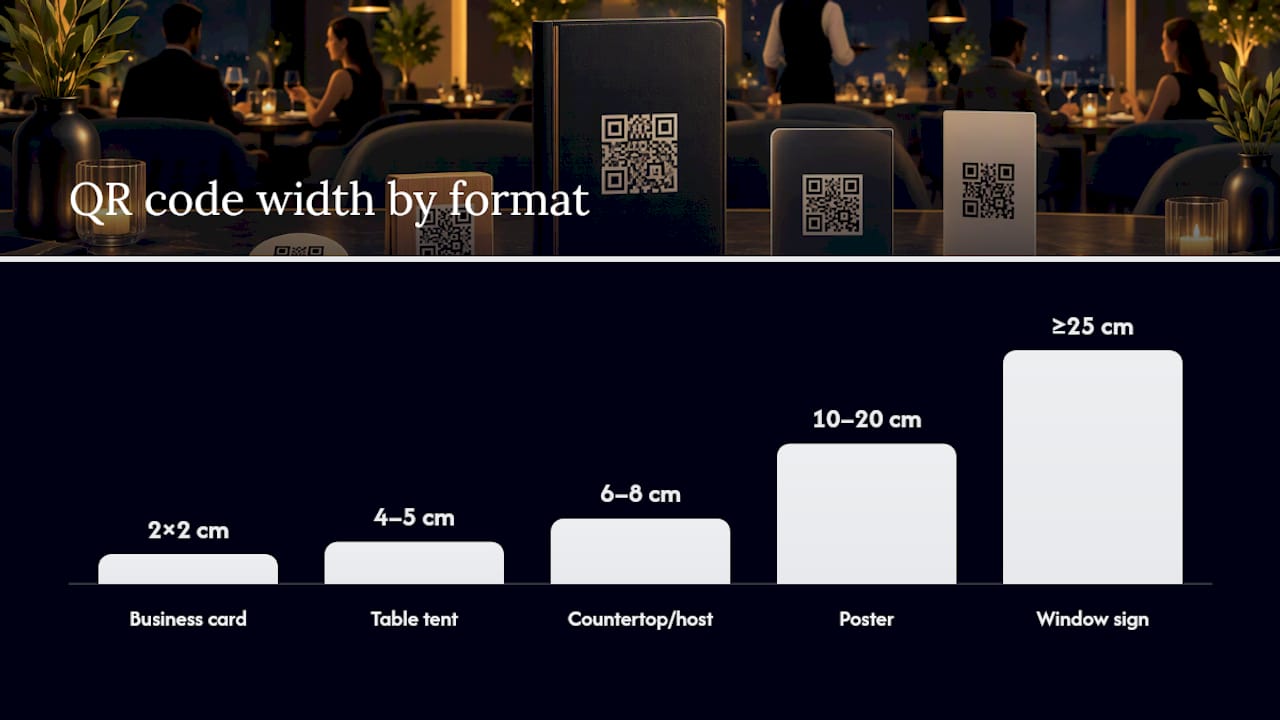
Here’s how the rule plays out across formats hospitality operators actually use:
Format | Typical scan distance | Recommended code size |
Business card or flyer insert | 20 cm | 2 x 2 cm |
Table tent or menu card | 40 to 50 cm | 4 to 5 cm |
Countertop or host stand | 25 cm or larger | 6 to 8 cm |
Poster (1 to 2 meters away) | 1 to 2 m | 10 to 20 cm |
Window signage | 1 to 2 meters | 25 cm or larger |
Notice the jump from table tent to poster isn’t linear guesswork. It follows the same 10:1 ratio every time, which is why the rule scales cleanly whether you’re printing a drink menu insert or a storefront window cling. OpenQR’s testing guidance backs the same floor and ratio, and treats the 2×2 cm minimum as a last resort, not a design target.
Where Should You Place QR Codes for Best Scanning Results?
Size only works when it’s matched to the surface guests actually encounter. A 4 centimeter code that scans perfectly on a flat table tent will frustrate guests if you shrink it down and slap it on a window facing the sidewalk.
Table tents and menu cards: 4 to 5 centimeters, printed flat, never on a surface with condensation rings or laminate glare.
Menu inserts (paper menus with a printed corner code): 3 to 4 centimeters, positioned away from the fold line so the code never bends across a crease.
Counter or host stand displays: 6 to 8 centimeters, angled slightly toward where guests naturally stand while waiting.
Windows facing the street: 25 centimeters or larger, since passersby scan from a car window or the far side of a sidewalk.
Posters near the entrance or host stand: 10 to 20 centimeters, sized to the 1 to 2-meter distance most guests stand at while reading a menu board.
The mistake we see most often: an operator prints one QR asset at table-tent size, then reuses the exact same file for a window decal or hallway poster. The code technically still “works,” but only if a guest presses their nose against the glass. Match the size to the surface, not the other way around.
What Printing Details Affect Whether a QR Code Scans?
Size gets a code most of the way there, but production details finish the job. GS1’s barcode printing playbook requires a quiet zone, the blank margin surrounding the code, equal to four times the X-dimension (the width of a single module) on every side. Skip that margin and even a correctly sized code can fail, because scanners use the blank border to locate the pattern in the first place.
Protect the quiet zone when placing a code into any layout; never let a border, logo, or decorative element crowd into that margin.
Keep contrast high: dark modules on a light background scan more reliably than the reverse, and inverted or light-on-dark codes can confuse some scanner apps entirely.
Avoid busy photography behind the code, even with decent contrast. A code sitting on top of a food photo often fails, because the scanner can’t distinguish the pattern edges from the image.
Choose a matte or satin finish over high-gloss, since glare under service lighting is one of the most common causes of a “perfect” digital file failing in print.
Use waterproof or laminated stock outdoors, but test the laminate under real light first. A lamination sheet that looks clear on your desk can throw enough glare under a patio umbrella to defeat the scan.
Pro Tip: Ask your print vendor for the exact X-dimension they used on your file, then measure the quiet zone yourself with a ruler on the physical proof. Digital previews lie more often than paper does.
How Do You Export and Resize a QR Code Without Breaking It?
Export format matters more than most operators expect. Adobe’s guidance on menu QR codes recommends SVG whenever your design software supports it, since a vector file scales to any table tent or poster size without losing a single edge. When SVG isn’t available, use a high-resolution PNG rather than a JPEG. JPEG compression introduces artifacts along the sharp black-and-white edges a scanner depends on, and those artifacts get worse every time the file is resized or re-saved.
Resize the whole asset proportionally, quiet zone included. Cropping just the black-and-white pattern and rebuilding a margin around it is a common shortcut that quietly breaks the required spacing.
Never stretch a code non-uniformly to fit a layout. An oval QR code is not a design choice; it’s a scan failure waiting to happen.
Pick the right error correction level. QR codes support four ECC tiers, and Level M or Q gives you enough redundancy to survive minor print imperfections without bloating the module count. Level H offers the most recovery capacity and is worth using if you’re adding a logo.
Keep any logo small. A logo that covers more than a modest fraction of the code’s face should be paired with a higher ECC level or a larger print size, and you should test the final logo placement at actual print size rather than trust the percentage on paper.
Shortening the destination URL before you generate the code also helps. Fewer characters mean fewer modules, which means a cleaner, more forgiving pattern at small sizes, an especially useful trick for table tents where every extra millimeter of code density works against you.
What’s the Final Checklist Before You Print a Full Run?
Skipping the proofing stage is the single most expensive shortcut in QR code printing, because a batch of 200 table tents costs far more to reprint than one test sheet costs to produce. Follow this order every time:
Print one physical proof in every format you plan to deploy, table tent, window decal, poster, at actual size, not a scaled preview on your monitor.
Test from the real guest position, not from your desk. Sit where a guest sits, hold your phone the way a guest holds theirs, and scan under your restaurant’s dimmest service lighting.
Scan with several phone models and operating systems. Older Android cameras and iPhones behave differently with dense codes, and a code that scans instantly on your phone might stall on a guest’s three-year-old device.
Check the destination’s load speed the moment the scan lands, and confirm the fallback short URL printed beneath the code actually works if a guest types it manually.
Test any laminated or curved surface separately. Domino’s printing guidance flags glare and curvature as two of the most common reasons a correctly sized, correctly proofed code fails once it’s mounted.
Get sign-off from whoever runs the floor, not just whoever designed the file. Front-of-house staff notice lighting problems designers never see.
Pro Tip: Keep a laminated “known good” proof behind the host stand. When a guest says a code won’t scan, staff can test against that reference sheet in seconds instead of guessing whether the problem is the code or the guest’s phone.
Should You Use a Dynamic or Static QR Code for Your Menu?
A static QR code bakes your menu content or a fixed link directly into the printed pattern, which means any price change, seasonal update, or new dish forces a full reprint. A dynamic code redirects to an editable URL you control, so the printed table tent never has to change even when the menu behind it does.
Use dynamic codes for anything printed on paper, laminate, or vinyl. One printed batch, unlimited menu updates, since the code always points to the same short redirect link even as the destination page changes.
Add a short, human-readable fallback URL beneath every printed code, since Adobe’s guidance notes that some guests’ cameras simply won’t cooperate, and a typed backup keeps them from walking away hungry and annoyed.
Include a short call to action next to the code itself, something as simple as “Scan for Menu” or “Tap to Order,” since guests unfamiliar with QR ordering often hesitate without a prompt.
Only label codes by table number if your staff can actually reconcile that data day to day. An unmaintained tracking system creates more confusion than the insight is worth.
Choosing a reliable QR code menu setup from the start avoids the reprint cycle entirely, since the printed asset never needs to change even as your kitchen does.
Why Getting the Size Right Matters More Than Most Operators Realize
Most guides treat QR sizing as a rounding exercise: pick a number between 2 and 5 centimeters and move on. That undersells how much the decision compounds. A code sized for a bright test bench but deployed on a dim patio table doesn’t fail occasionally, it fails predictably, at the exact moment a hungry guest is deciding whether to bother scanning at all or just flag down a server instead.
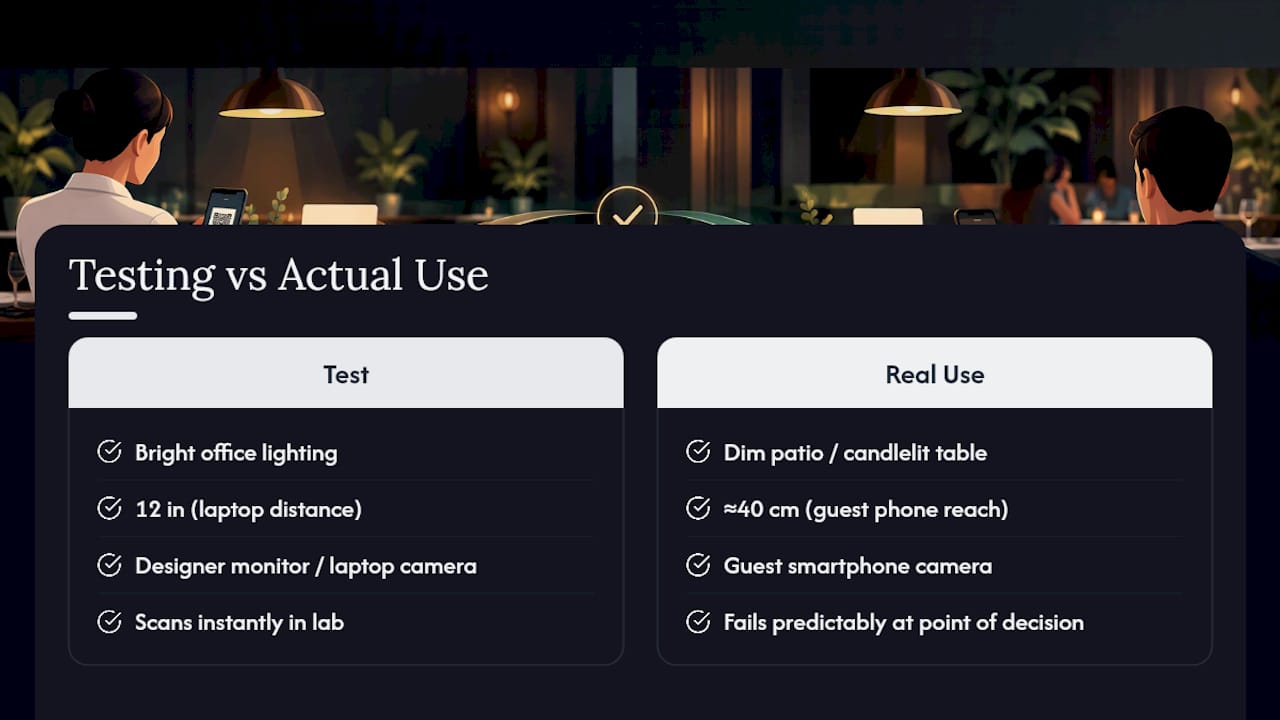
The overlooked variable isn’t the code’s size in isolation. It’s the mismatch between where operators test a code and where guests actually use it. A file that scans instantly on a designer’s monitor, held twelve inches from a laptop camera under office lighting, tells you almost nothing about how it performs at a candlelit two-top forty centimeters from a guest’s phone. That’s why the proofing step matters as much as the math.
Menu platforms that handle the QR menu design and the printed code as one connected system, rather than a designer’s file handed off to a print shop in isolation, tend to catch these mismatches before they become a reprint bill. The technical standards from NN/g and GS1 are sound. The gap is almost always in how operators apply them to their own dining room.
— Abhi
Skip the Reprints With a QR Menu Built to Update Itself
Every rule in this guide gets easier when your QR code points to a menu you can edit in minutes instead of a file you have to redesign and reprint. Mydigimenu’s QR Menu uses dynamic destinations, so the printed code on your table tents never changes even when your dishes, prices, or specials do. Pair that with a short, guest-friendly fallback link and a mobile menu built for fast loading, and the sizing work you just did protects an investment that actually lasts.
If you’re weighing platform costs against a DIY print-and-generate approach, the pricing plans lay out exactly what’s included at every tier, from the StartUp Menu plan up through Diamond and Emerald. Restaurants running a full front-of-house digital setup might also look at the Tablet Menu as a companion to printed QR codes for tables near the bar or host stand. Check the pricing page today and see which plan fits your dining room before your next print run.
Sources
FAQ
Can I Make a QR Code for a Menu Myself?
Yes. Any QR generator that accepts a URL can create one, but the reliability comes from what you do next: proper sizing, a preserved quiet zone, and a printed proof tested under your dining room’s actual lighting. A dynamic QR menu setup also lets you update the destination without regenerating or reprinting the code itself.
What’s a Good Size for a QR Code on a Restaurant Table?
For a seated guest roughly 40 to 50 centimeters away, 4 to 5 centimeters is the practical default, with 2 centimeters as an absolute floor for anything closer. Posters and window signs need to scale up using the 10:1 rule since guests view them from much farther away.
Can I Scan a QR Code to View a Restaurant Menu?
Yes, once the code is scanned with a phone’s camera or a QR scanning app, it opens a link that loads the restaurant’s digital menu in the phone’s browser, no app download required. This only works reliably if the printed code meets minimum size, contrast, and quiet zone requirements, which is why proofing before a full print run matters.
How Do You Resize a QR Code Without Breaking It?
Resize the entire file, including its quiet zone, proportionally rather than cropping or stretching just the black-and-white pattern. Exporting as SVG or a high-resolution PNG avoids the pixelation and edge artifacts that JPEG compression introduces at different sizes.
Recommended
Comments